Facebook: Southern Kiwi Photography | Twitter: SoKiwiPhoto | Google+: Kaylene Fister | LinkedIn: Kaylene Fister
Showing posts with label SKP PhotoTips. Show all posts

Tuesday, September 10, 2013

Morgan | Playing with Light


Sometimes I ask someone to step in front of my camera just for the fun of it and for this shoot I wanted to play with different lighting setups.

The photo above was made on a bright sunny day, inside my garage.  The natural 2pm daylight is reflected off the concrete driveway straight onto Morgan's face, resulting in Flat Light: a low contrast look that gives very little detail to the face, emphasising the eyes and mouth.

Compare this with the photo below, which I made using my studio lighting setup.  The main light is a softbox just in front of, and very close to, her left shoulder (camera right) but not aimed directly at her.  Instead, the light which 'spills' off the edge of the softbox is what reaches Morgan's face, creating a much softer look.  This technique is called 'feathering' the light.  

In addition, I placed a diffuser between the softbox and Morgan's face to soften the light even further.  Finally, there's a second light behind Morgan on her right, which serves to separate her from the background a little, often called a 'kicker' light.   You can see the effect of this light in the hair on the right side of her head (camera left).

The angle I'm shooting from produces what's called Short Light on Morgan's face.  The fully-lit side of her face is turned slightly away from the camera, leaving the shaded side toward me.  This creates a little shadow in the outside curve of her nostril called Loop Lighting, as well as giving definition to her right cheek bone.


So which is best?  It all depends on your taste and why you're photographing the model.  What story are you wanting to create with your image?

These photos of Morgan were taken just after she'd graduated as a high school senior and not long before she headed off to university, to study photography.  I've seen some of her work and she's definitely someone to watch.  Thanks, Morgan - and best wishes!

Friday, April 19, 2013

Was the Moon Landing Faked?

Six years ago I taught a church Sunday School class of 12 and 13 year olds and one week I asked if they knew what the Berlin Wall was.  Considering that they had never heard of it (seriously?  What's wrong with the education system today?!), then it's not really surprising that some people think the moon landing in 1969 was a hoax.

In this video, S. G. Collins sets out to show it wasn't a hoax.  As description on his post says; "Collins is not sure if men went to the moon. but he is sure they could not have faked it."

Setting aside your personal viewpoints on the political and other topics briefly mentioned in this clip (all done very tongue-in-cheek), you'll find, in addition to Collins' lovely sense of humour, some interesting stuff on lighting and film / video technology.


Tuesday, February 5, 2013

The Power of an Image

Lots of people are raving over the Ram Trucks Super Bowl ad - and rightly so, because it is a good one.  Coming from New Zealand, where farming is a huge industry, I'm partial to this kind of imagery.  I didn't grow up on a farm but I'm from a small town and had friends that did live on farms.  I even managed to convince Mum to let me have a pet lamb one year, to go along with the rabbit, two cats and a dog.

Have another look at the commercial, this time with the sound off. The images are fantastic! They portray the gritty tenacity that makes a farmer successful. It's not just a career, it's a way of life and the photos on this video are a window into that life.

Think about this video when you next go out to have some fun with your camera.  Remember how it tells a story, even without the audio.  Try to accomplish the same with your photography - we're storytellers and images are our means to that end.


Thursday, January 10, 2013

What to Wear on Your Photo Shoot

Notice how the colours worn by each person are in the same palette (earth tones) and are brought together in the scarf.

One thing that all of my clients ask me (well, except for the four-footed kinds) is: "What should I wear for my photo shoot?"  While the type of shoot does determine the style of clothing, e.g. formal, casual, individual or family portraits, there are some basic guidelines that you should consider.

Colour
Don't wear brightly coloured clothes!  They look good in real life, but neon-bright shirts or blouses will give a tint to your neck and face that won't show up until you see the photos.  That said, don't feel the need to stick with neutral tones.  Choose colours you like that flatter your skin tone, as well as your eyes for those close-up shots.

When dressing for your family photo shoot, you want to look like you're meant to be together rather than a group of people randomly gathered off the street.  But this doesn't mean donning a uniform of khaki pants and white shirts.  It's often easiest to use pants and skirts to create a coordinated base and allow individual characters to show through with the remaining clothing.  Help younger children to select their clothes and give older family members guidelines that help them stay coordinated.

Remember also that the eye is attracted to the lightest part of the photo, so if one person is wearing a shade of clothing that's a good deal lighter than the others, the viewer will automatically be drawn to that person in particular.

If you're planning on having a wall portrait made for your home or office, consider the colouring of the room where your piece will hang.  Look for shades that complement those of the surroundings instead of competing with them.

Patterns
While we don't need to completely avoid patterned clothing, it's best to be conservative in your choices.  Individual photo shoots such as seniors, baby portraits and headshots are more forgiving, but it is possible to include patterns in family portraits without causing eyestrain.  Regardless of the amount of people involved, choose a basic pattern such as stripes or argyle so that your clothing doesn't upstage you.

If you do decide to incorporate patterns into a group photo, have only one or two people (depending on the size of the group) wear a pattern and make sure the patterns are similar.  Base the other subjects' clothing around the colours included in this pattern.

Style
You may also want to think about clothing trends: what looks good this year might be out of style next year.  And while we can't avoid changes in fashion, selecting clothing that isn't outrageously trendy helps prevent photos from looking overly dated, even when they're 20 years old.

Of course, you might want something completely different.  Coordinating a group of family or friends in a period theme is fun and can add a new dimension to your family portraits.  I rented clothing from a local theatre company for a personal photo shoot a few years ago, which made for a lot of laughter and enjoyment.  Which is what we want in our photo shoots, right?!

Location
Keep in mind the location of your shoot.  Unless you're having a beach wedding, your seaside photos will look better with fun, summer-type clothing rather than formal attire.  Urban areas might call for a stylish look while natural settings will favour more casual clothing.  Be aware that you will likely be sitting on the ground at some point in your photo shoot and while I do bring something for people to sit on if necessary, it's better to dress with this in mind.

Most of all, you want to wear clothes that make you happy and are comfortable to wear, so that you'll be relaxed during your photo shoot.

Tuesday, December 4, 2012

A Time for Family & Friends


Thanksgiving has come and gone here in the USA and Christmas is coming up soon all over the world.  The holiday season is a time when folks spend time with friends and family, reminiscing about past times, planning fun future activities and enjoying each others' company.

But there's allllllways someone who wants to take photos, right?  And don't we just hate it when we're in the middle of a nice meal and someone decides to snap a photo of us while we're attempting to stuff a forkful in our mouths...

Don't do it, folks!  No-one likes awkward photos of themselves plastered all over the various social media sites, no matter how funny it may seem at the time.  But don't put away that camera completely during this season of gatherings - one day we'll be grateful  for those photos.

Do catch people being themselves and enjoying the moment.  Photograph them around the table, laughing and talking with loved ones.  Use a shallow Depth of Field to cut out the background clutter.  Zoom lenses are great for capturing natural, candid moments, but don't abuse it!  Aim to make people look fantastic, not ugly.

Have a look on my website for a short story about a little girl who'd never seen herself in a photo before.  That's the sort of thing we can do as photographers.

Last year I wrote a post with tips for taking posed photos of large groups.  Try them out at your next party - and especially remember the part about not being grumpy!

Monday, August 6, 2012

SKP PhotoTips - Shutter Speed

In one of the SKP PhotoTips posts I talked about Aperture and how it affects the Depth of Field in your photo.  Today we're going to explore Shutter Speed.

Contrary to what many people believe, shutter speed is not how quickly the shutter moves when it opens and closes; rather it determines how long the shutter is held open before it closes.  And there are two things that happens when the shutter is held open: 1) more light gets in and 2) the risk of / opportunity for movement blur increases.

Wait - 'opportunity' for blur?  Yes - when done well, blur can create wonderful photos.  Think of images you've seen of recent Olympic track cycling events.  The best ones will show the cyclists 'tack sharp' - as a clear, frozen image - with the background streaked.  In this case, the more blurred the better as it gives a strong feeling of movement.

So how do you achieve this?  By dialling down the shutter speed so that the sensors have more time to capture the image and 'panning' with the subject.  This is also how photographers capture the silky effect on waterfalls (except for the panning part.  That's a topic for another day).  The problem with a lower shutter speed is that you run the risk of unwanted blur.  There's not much point in a nice, streaky background if the cyclists are blurry due to camera shake.


The further you lower the shutter speed, the more you need to stabilise the camera and the most common way is to use a tripod.  But you don't always have that option - some well-visited tourist attractions won't permit tripods, or you might not have one handy.  When faced with this situation, find somewhere stable to place the camera, such as a tree stump or your car roof.  Or, you could steady yourself: pressing the lens against the corner of a wall can stop movement just enough to deal with a slower than normal shutter speed.

Of course, there comes a point when it's simply too slow for hand-holding a camera.  A safe rule of thumb is not to use a shutter speed that's lower than the length of your lens.  Which means that if you're using, say, a 70-200 lens and you have it fully zoomed out to 200, you should set your shutter speed to a minimum of 1/200sec.  Play with this to see what works for you - I've successfully taken photos at 1/15sec and then others that were blurry at 1/100sec.  It depends on the situation - are you nervous about taking the photo or did you just run to catch the perfect spot?  Then you're more likely to have shaky hands.

In addition to bracing yourself, there are other ways of keeping it steady.  Shooting at 1/15sec is about where your heartbeat starts to cause camera shake.  So the one thing you don't want to do (and which you should not do in any photography situation) is hold your breath.  Because holding your breath causes your heart to pound and your hands move ever-so-slightly when your heart beats strongly.


So here's a tip you should use every time you take a photograph:  breathe normally and calmly, then while breathing out, slowly and gently press the shutter.  Continue pressing the shutter until after you hear both the open and close clicks, and continue to breathe out until after you release the shutter button.  Practice doing this and you'll find you're doing it without thinking about it.

What are your thoughts?  What methods do you use to prevent camera shake at slow shutter speeds?


Monday, February 20, 2012

SKP PhotoTips - Leading Lines

Sometimes what makes one photo more interesting than another is the viewer's ability to 'discover' something that might not be obvious at first glance.  Admit it, a couple of years ago you probably stood at a mall kiosk, tilting your head, trying to find the hidden 3-D image inside one of those weird-looking pictures, right?  I know I wasn't the only one with a crick in my neck after doing that...

One of the many ways you can add interest and depth to an image is the use of leading lines.  They draw the viewer into an image and, when done well, leave him there to wander around for a while.  Have you ever noticed that sometimes a photo causes you to pause and look for more?  Odds are it has lines that keep your attention.

The photo of road lines is a clear example of how lines can draw you into and through a photo.  Your eye automatically follows the bright yellow path and stays with the fairly vertical movement - there's no compulsion for left-to-right tracking here.


Driving back from our Thanksgiving trip out west last year, Steve and I passed through St Louis.  The day was various shades of flat gray and we didn't have long to stop, but having never been in the city, I wanted to see the Arch and give myself a memory of its size.


This photo did just that for me, but in terms of leading lines it's not good.  While the arch leaves the frame in a similar position to the yellow lines above, the lines tend to pull the eye right out of the image in a distracting way.  The lines were the subject in the road photo (no less so than the leaf) but here the trees are in a losing battle with the Arch for your attention.  Do you notice that happening?

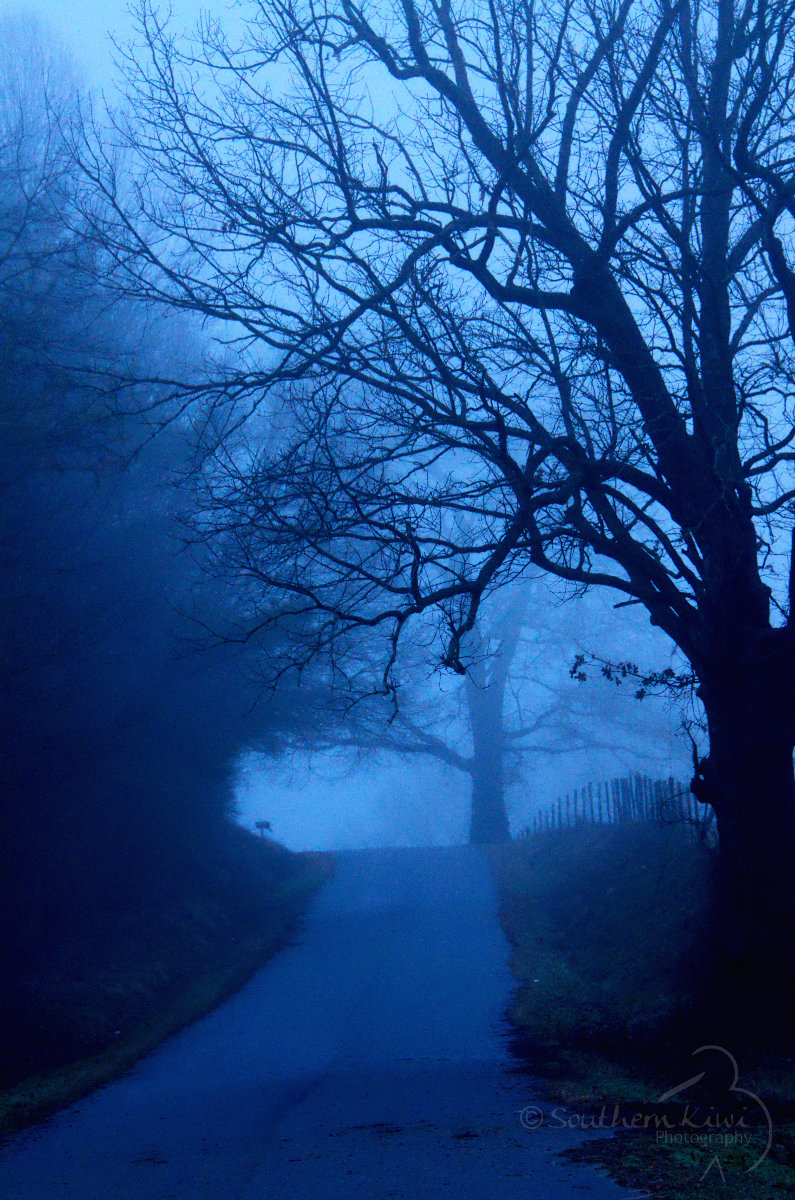
I took this last photo as light was failing on a foggy day a few weeks ago.  It's a much better example of the way lines guide the eye, so let's talk about what we have.


The most obvious line is the road itself - a clear path (pun intended!) right into the lower middle of the image.  In addition, we have the edges where seal meets grass - black lines leading in.  What about the fence to the right?  It runs in parallel to the road, reinforcing the direction.

Sure, we have a somewhat strong black line created by the tree, disappearing at the top middle, but by the time it reaches that point it has weakened as the branches divide and thin.  But do you notice the two downward-curving branches?  They are at least as strong as the straighter branch and lead your eye back toward the road and the uncluttered lighter area where the road disappears.

So now that we're a little more aware of the effect of lines, can you see them around you more?  My bet is you will - it's like when you buy a car and suddenly notice how many people are driving that model.  Architecture, whether man-made or natural, is full of lines.  Play with them and see what works and what leaves you stranded.


Thursday, January 5, 2012

SKP PhotoTips - Tracking Your Progress

The more you get out there and shoot, the better your photos will be, right?  Practice makes perfect...  But have you ever looked at a photo you took and wondered what magic you performed to produce something that fantastic?  There's a lot to remember when you're starting out and it'll be a while before selecting the best settings to achieve the affect you want becomes second nature.

In the meantime, what can you do to help your progress?  You can look at your photos and see how your photography is maturing over time, but even that's of no use if you don't understand what you're doing to produce better results.

One way to keep track of the technical side of your work is to use a checklist.  There are plenty of sites on the internet that can give you ideas for what to record.  I liked the look of this one (HERE) and adapted it to my needs.  The preparation for every photo shoot I do includes completing one of these before I head out the door, whether it's for a client or my own personal work.

Some of the basic information you'll want to note includes:
  • Camera Mode: are you shooting in Auto, Aperture Priority, Shutter Priority or Manual?
  • What lens did you use?
  • ISO setting
  • Aperture (f-Stop)
  • Shutter speed
  • Focus: auto or manual?
  • Light source: e.g. natural or studio?
  • White balance
  • Did you use a tripod?

Obviously, this is not an exhaustive list of what you might want to record.  Think about what you want to improve on and include it.  Also, add a section for notes and results - give yourself a grade on how the shoot went.  How could you have done better?  What pleased you about the shoot? The main thing is to experiment and learn what works for you.

Thursday, December 29, 2011

SKP Photo Tips - Aperture

Warning!  We're about to move out of the point-and-shoot settings on your camera and into the Creative Modes side of the dial.  Oh noes!!!  But before we do, here's a poll on your initial reaction to the title of this blog.  Take a moment to fill it out and remember - all votes are anonymous.  We don't keep track of you :o)


Okay let's get on with the discussion of aperture - we're talking f-stops and Depth of Field.  Have a look at your camera's mode dial; on one side you'll see a bunch of icons and on the other, some letters.

Image courtesy of Nikon.com

What we're looking for is the aperture priority mode, which is 'A' on Nikon and 'Av' on Canon.  When you set the camera to this function, you are giving yourself control over how large or small the aperture is, basically: how wide the shutter opens when you take a photo.  Whoopie doo, you say?  Well, remember the little girl from our post on storytelling? (Click HERE)  I had the f-stop set too low, giving a very shallow depth of field which makes it hard to tell what she's looking at.

Whoah Nellie!  Too many terms that need definitions.  Aperture priority mode allows you to select what's called the 'f-stop' by using either a button or another dial, depending on your camera (check your user manual).  And here's the tricky bit - the lower the f-stop, the wider the aperture.  Huh.  Don't ask me why - I'm a creative type, remember?

Okay, now for the next definition:  Depth of Field.  This determines how much of your photo, from foreground to background, will be in focus.  If your depth of field is shallow (or narrow), a good part of the image will be out of focus, highlighting the main subject, as in this photo:


See how the background is blurred?  That's what depth of field can do.  Notice how her eyes are in focus but the raindrop on her hair is out of focus - that's a very narrow depth of field.  In the photo below, the mushrooms are in focus but everything in front of and behind them is out of focus.


So now that we know what f-stop and depth of field are, we need to know how they work together.  The lower the f-stop, the wider the aperture, right?  What's easier to remember is: the lower the f-stop, the shallower the depth of field.  They both get smaller or larger together.  An f-stop of f5.6 will give a very narrow depth of field, while a higher f-stop of, say, f22 will give you a photo that's in focus pretty much from front to back.

But why do we want to bother with all this?  Look again at the statue above.  If I had taken that with a higher f-stop, the background would be more in focus, introducing too much clutter into the photo.  The statue (which is the subject) would compete with the non-essential parts of the image.  Show the viewer only what you want them to see.

These next two photos are taken with a higher f-stop.  The colours of the car are reflected in the trees, but instead of blurring out the trees completely I opened up the aperture a little, allowing the viewer to see where the car is.


This beach photo is taken with the highest f-stop of these four images, to get as much as of the vista as possible in focus.


There is, however, a problem with opening up the aperture.  A wider opening means... you've got it - more light gets in.  And it's not much good to us having a bunch of photos that have fantastic focus but are all washed out.  Rats.  But not to worry, there's a way to fix the problem.  It's a balancing act between the f-stop (aperture) and shutter speed (how long the shutter is open).  We'll talk about shutter speed in another post.  In the meantime, see what happens when you play with aperture - have some fun!

Friday, December 16, 2011

SKP PhotoTips - Guest Blog

We have a bonus PhotoTips blog this week - and not only that, it's a guest blog!  Jim Harmer at Improve Photography posted a tip on his blog discussing the best way to hold a DSLR camera.  Click HERE to read his post (link posted with permission from Improve Photography).  Enjoy!

Wednesday, December 14, 2011

SKP PhotoTips - It's Storytime!

Famous author Ernest Hemingway wrote a story in six words: "For sale: baby shoes, never worn."  Think about it for a bit - there's a huge story behind those few small words.

[Right here I sidetracked myself by doing a search on writing a story in six words and found a site with a bunch of them.  My favourite was from Alan Moore: "Machine.  Unexpectedly, I'd invented a time".  But I digress...]

In photography we have a similar opportunity.  One image can portray a powerful message - think about the famous Vietnam War photo taken by Nick Ut (click HERE).  While we are not necessarily in a position to capture such a haunting image, we nevertheless can look around us for ways share a story with our audience.

This first photo is an example of not quite giving enough detail for the viewer to allow his or her imagination to run.


I was inside a shop and turned around to see the little girl in total awe of the window display.  To be honest, this is more of an opportunistic snap than a composed photo - I knew I'd lose the moment if I took the few seconds I needed to change settings on the camera.  It's still a cute photo of the girl, but the viewer can't tell the reason for her expression.  What she's gazing at is a window full of little rubber duckies; the classic plain duckie, a policeman duckie, a country duckie - all sorts of different and fun characters.  I'm pretty sure I had a similar look on my face when I stood outside the shop...

I took the following photo of a tiny snail on an epic journey this past summer while on a hike in the North Georgia mountains - a simple photo that allows the viewer to construct a quick story in their mind.


As a side note, it's also a lesson for us photographers - don't forget to pay attention to the small stuff all around us.  And that's pretty much what we're all about - noticing and capturing the moments that others might not see.

Lastly, here's a photo from the first post on this blog - of the Atlanta Renegades rugby team (click HERE for that post).  It was an emphatically one-sided match, as can be seen from the mid-first-half score of 64-0 and the complete resignation of the opposing team player.


So go on - get out there and tell those stories that are all around you!  There's sure to be plenty of them coming up in the next few weeks, with family and friends gathering.

Wednesday, December 7, 2011

SKP PhotoTips - Winter Blues or Glorious Gloom?

We've had gray, rainy days for so long now it seems as if the sun has migrated south along with the birds.  And in a way it has, seeing as my homeland New Zealand is starting to bask in the light and warmth of early summer.

Nevertheless, from a photographer's viewpoint gloomy days are glorious!  The light is soft; not harsh as it would be on a sunny day.  The only thing you need to worry about is getting rained on with that camera.  Autumn leaves look pretty against a brilliant blue sky, but in my opinion they look even better against a backdrop of soft gray clouds.  They're not competing for the eye's attention.


Sooner or later, the clouds will move on and we'll have sunny days again.  So what can we do to rescue our photos from the harsh, flat light of an otherwise beautiful blue day?  People can be moved into the shade (but watch out for dappled light as it filters through the trees) or if you have a handy assistant, they can hold up a shade.  You don't need to rush out and buy a set of shades and reflectors - they can be expensive.  A light-coloured sheet will do in a pinch, just be aware that the colour may cast a hue on your subject.

But what do we do with landscapes?  The best times for shooting outdoors are dusk and dawn.  That's when the shadows are longer, giving more depth to the vista and the light's coming in from the side instead of directly above.  And we all have enough tired-looking shadows under our eyes without using the sun to emphasise them!

Besides that, the light is magical.  The basic rule of thumb is roughly 30 minutes before sunrise to an hour after (at most) and 30 minutes either side of sunset.  This will give you the rosy hues of dawn and the golden light of day's end.  And really dramatic skyscapes as the sun pokes through after a storm.  What more can a photographer want?  Don't waste time in front of a computer trying to mimic the beauty that's around you; get out there with a camera and make it yours!


Wednesday, November 30, 2011

SKP PhotoTips: Be Prepared - Not Just for Boy Scouts

One of the things I most like to do is to photograph people doing their thing.  People act differently when they are aware that a lens is pointed at them.  While you may be able to get natural expressions, for the most part people will not allow you to see a less-than-perfect or a vulnerable side to them.  And it is often these moments that result in captivating photos, whether they are fun or thought-provoking.

Don't get me wrong - I'm not suggesting you become a creepy-stalker-type!  People don't like that too much either...  Simply be ready to catch the unexpected photo:  leave the camera turned on and the lens cap off.  And always put the lens cap in the same safe place to avoid losing it.  I've lost two over the past 20-something years and it's never a happy thing.


Using a zoom lens helps capture a genuinely candid moment.  You have the ability to distance yourself from the subject, yet crop in closely on them.  Here are a few examples of catching the subjects being themselves.  In each case, they were aware I was in the area with a camera, but they didn't realise they had my attention at that particular moment.


Father and son sharing a quiet moment during a hectic, fun-filled day.


Waiting while his family gets ready for the photo shoot.


Explaining something to Dad.


Beautiful, serene pose.  But what she's really thinking about is if she'll get some of that cake and ice cream.


Flour bomb fights.  No better time for a photographer to have a zoom lens!

Posed photos are important and will always have their place, but I especially enjoy photographing someone not on display - and then showing them how beautiful they are.


Wednesday, November 9, 2011

SKP PhotoTips - Say "Cheese!" (Holiday Photos)

Over the past few days some of my clients have ordered Christmas cards using images from their photo shoots, making me realise it's coming up on that time of year - very quickly.  In two weeks' time, people all over the USA will be gathering with friends and family for Thanksgiving, with Christmas and other holiday season celebrations occurring around the world soon after.  What are you going to do to record this year's memories?  Here are a few tips for taking great group photos.

One of the hardest things you'll face when photographing groups is to make sure everyone has their eyes open and is looking at the camera.  I learned a simple trick from photographer Scott Kelby - ask the whole group to close their eyes and open them on your count: "3, 2, 1 - open!" and then wait one extra count before taking the shot.  It works like a charm!  The extra count allows the subjects to relax and avoids having wide-eyed, freaked-out-looking people in your photos.

If you are working with a large group, point out to them that if they can't see the lens of your camera, they won't be in the photo.  It's amazing how many people apparently forget this and suddenly start shuffling around to make sure they have a clear view of your lens.

In the northern hemisphere we'll likely be indoors for our holiday parties and odds are you'll need to use a flash.  Avoid using mirrors and windows as backdrops, unless you like the look of an all-encompassing reflection flare.  Built-in flashes seem to be designed to make everyone look like Casper the Friendly Ghost.  Simply fold a tissue and place it over the flash to soften the light, making your subjects look warmer and lessening harsh shadows.

Most cameras have a red-eye reduction feature, but you can help prevent this little nasty by adding as much light as you can to the room.  Turning on all the lights shrinks the subjects' pupils - and every little thing helps!

One last tip - smile and have fun!  If you're grumpy and getting frustrated, no-one will want to smile.  Give them a reason to be happy about looking at you.

Wednesday, November 2, 2011

SKP PhotoTips - Focus on What's Important

What's the first thing you notice in the photo below?


Okay, apart from the huge big watermark splashed across the boy's face... (which, by the way is to protect the photo on my client's behalf - she already has everything she wants from the photo shoot).

Have you ever noticed that even animals will seek out your eyes when looking at you?  They have a natural instinct to look into another being's eyes; the same as we do.

When it comes to portrait photos, it's critical to have at least one eye in focus.  Just as it confuses the viewer when you don't give the photo a clear subject (click HERE for our discussion on that topic), if both of the subject's eyes are blurry, the photo becomes frustrating for the viewer.

In the photo above, the boy's right eye is out of focus due to the narrow Depth of Field (we'll talk about that in a future post), but his left eye is sharp, giving the viewer a clear focal point.  And it doesn't matter whether your subject is a little boy or a squirrel - if you're photographing the face, the eyes are all-important.

Wednesday, October 26, 2011

SKP PhotoTips - It's All About Perspective

Odds are you've either taken or seen a photo of a 'miniature' person standing in the palm of their friend - you can have a lot of fun playing with perspective and distance.  On the other hand (excuse the pun!), remember when you took a great photo but it didn't quite portray how big or how small the subject was?  It's a good idea to incorporate something into your image that gives the viewer a sense of scale. 

We put in a veggie garden this year - here's a photo of a couple of red potatoes we grew:


They look a little on the smallish side, but you don't realise just how small they are until I include something that gives you a better idea:


As you can imagine, I was a little underwhelmed by these two.  For the record, we did harvest some larger potatoes, but the sweet potatoes were a much better crop.

But you can see what I mean about giving the viewer a reference point.  The photo below is of a famous Kauri tree in New Zealand.  It's of great significance to the Maori people, who named it Tane Mahuta, which means God of the Forest.  The Kauri is a beautiful tree with a scalloped bark that glows silver in the sunlight as it stands above the canopy of the forest.


You're not really sure how big it is until you notice the people at the bottom of the frame.  The woman closest to the camera is still a good distance from the tree, as you can see by the size of the blonde man, wearing a gray, sleeveless shirt.  He is standing on a platform built to protect the tree's shallow roots from tourists and is further from the tree than the woman is from him.  As a further reference, the man is roughly 1.83m (6ft) tall.

The next time you're out taking photos, think about how to help the viewer see what you saw.  Want to remember how tiny your baby's hands are?  Capture an image of him wrapping his fingers around one of yours.  Cradle that tiny kitten in the palm of your hand.  Be inventive and have fun!

Wednesday, October 19, 2011

SKP PhotoTips - Room to Breathe

In last week's post about the Rule of Thirds (click HERE) we discussed one of the simplest ways to improve our photography.  This week we're going to explore it a little further and see one of the reasons why it works.

When photographing a moving object, make sure it has room to move within the frame, otherwise the image will have a choked feeling.  The rabbit below is a good example of this.  When I originally framed the photo he was on the right vertical third line, but he spotted me and moved.  I moved with him but couldn't recompose the photo properly because of the plant to the left of the image.  The resulting image is of a baby bunny, ready for flight but with nowhere to go. 


This photo, of a Black-Backed Seagull, is a better example of allowing space for the subject.  The bird is on the top left line-intersection, which gives it two-thirds of the photo to move on its flight path.  He looks a lot more comfortable and free than the bunny!


These next two photos were taken when I was using a film camera and show how you can create curiosity in the viewer.  We wonder what has caught their attention so strongly.  The little dog is looking at something on the other side of the frame, while the kitten - typical for his type - is so captivated that he ignores the photographer and focuses on something completely separate from us as viewers.


Although the we've observed the Rule of Thirds and have placed the kitten on the top right line-intersection, he is looking out of the closest edge of the frame rather than looking across the image.  We've broken the rule of giving space for the subject to move, but it doesn't feel awkward as it did with the bunny.  The black and white bands of the stairs give a feeling of imprisonment, which the kitten is completely ignoring, fascinated by something we can't see.

So there you have it.  Rules are meant to be followed - and broken when it creates a good image.  The best way to discover what works and what doesn't is to get out there and experiment.  The joy of digital is that it doesn't cost anything to learn from a bad photo!

Wednesday, October 12, 2011

SKP PhotoTips - the Rule of Thirds

It's very tempting when you see an eye-catching subject, to put it right smack in the middle of the frame.  After all, that's what you're photographing.  The problem is that putting the subject centre stage leaves you with an image that feels unbalanced or even downright boring, as in the example below:


The Rule of Thirds states that you should divide the image into thirds horizontally and vertically, as in this drawing:


Now you can start to have all sorts of fun.  Firstly, you have the four points where lines within the image intersect.  Placing the subject or main feature of a subject at any of these points will result in a more interesting photo.

Second, using any of the horizontal or vertical lines as a guide will also give you a better photo.  Have a look at the first image again, but this time as it was actually taken:


The subject is positioned on the left side vertical third, giving more room to the right.  But that's not all - the couple's faces, which are the main feature of the subject, are placed at the top left intersection.  Their reflection faces are at the bottom left intersection.

An important side note:  be careful of having two equally strong subjects in the same image.  Pay attention to how your eye moves as you look at a photo.  It tends to move around the image but always returning to rest on what catches it the most.  If you have two subjects that attract the eye equally, it becomes confused, leaving the viewer unable to decide where to look.  In the photo above we have the subject shown twice, but notice how the reflection isn't as strong as the actual couple, as well as being upside down.  We notice the reflection and may wander off to look at the dam wall (drawn by its movement through the frame and its placement on the top right intersection), but we frequently and ultimately return to the couple.

The Rule of Thirds also applies to landscapes.  Have a look at the photo from last week's tip (click HERE).  Notice how the girl is on the left vertical third line, but where's the horizon?  A third of the way up from the bottom of the frame.

We'll discuss landscape composition further in a future post, but a basic rule of thumb is: Don't put the horizon in the middle of the photo.  Of course, as they say: rules are meant to be broken, but you have to know them before you can break them effectively.  In the meantime, here are another couple of photos demonstrating the Rule of Thirds:


Wednesday, October 5, 2011

SKP PhotoTips - Get Down on Your Knees

One thing we adults tend to forget is that there is a completely different world below us.  For us the change has happened slowly, over the years and so we don't notice how things might look differently from a shorter perspective.

When done right, shooting down on children can produce fun pictures, but for the most part it's better to take photos of them at their level.  It gives you the feeling of seeing the world through their eyes, instead of through your own.

 
The same goes for animals: want to take a photo of Pookie or Fluffy?  Get down to their level, instead of taking shots of the top of their heads.  Just make sure Pookie doesn't put his wet nose on your camera lens! 

Change your approach to the subject - literally.  Most flowers are around our feet or knee level.  Have you thought about what they might look like side on?  Or looking from the ground up?

Sometimes it's the simplest thing that can make a great photo - and usually it's showing the viewer something they're not used to seeing.  You might get a little (or a lot!) dirty, but hey - it's worth it to get the shot, right?

Wednesday, September 28, 2011

SKP PhotoTips

Today we're launching a section with tips for how to get more out of your photography. We have some topics in mind for upcoming posts, but first we want to find out what you want to learn.

Take a moment to fill out the survey below and teach us what we can do to help you.